
Terminology
One of the first things that hit me when I first stepped into the world of iOS development was the terminology around the deployment process. Apple have developed a system such that only cryptographically signed binaries can run on iPhones & iPads. However the whole process by which this is done seems at first completely arcane and bewildering. So here is, hopefully, some clarification based upon what I've learnt over the past few months.
Certificate
This is the basic piece of information that is used to sign the resultant binary of your app. If the binary is not signed by a certificate then it won't run on your device. End of story.
There are two types of certificate:
-
Development certificate
This is a certificate issued to you personally as a developer when you signed up to Apple's development program. This is the certificate that is used to sign the apps when you create something in Xcode and deploy it locally to your iPhone plugged into the USB port. Typically, each developer in your team would have one of these.
-
Distribution certificate
This is a certificate used by Apple to distribute your app to other people. This can be via the official Apple App store or via adhoc means such as HockeyApp. Typically this would be for an organisation, not an individual. You can have two of these at a time, so you can manage rolling renewals of them. Whilst this cert is for the organisation, the certificate and it's corresponding key have to live somewhere. Typically this is on the computer of the developer that set it up (in their keychain) and only that developer can deploy apps. This soon becomes difficult to manage, as I'll explain later.
Key
The private part of the certificate. This is needed to cryptographically validate that you are the owner of the certificate. It is needed in order to sign a binary with the certificate. Again, this key is usually in a developer's keychain.
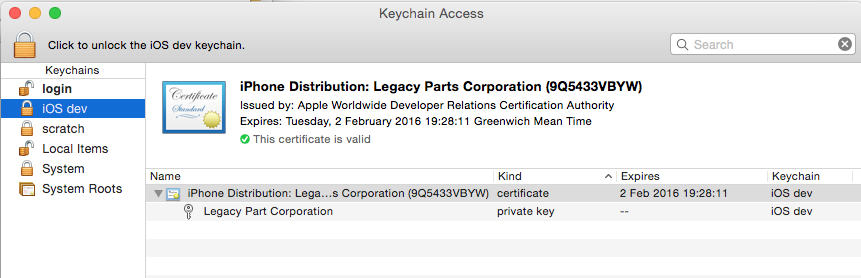
The person that has the key has the sole ability to sign apps for that organisation. This is where the headache begins. The key is on Bob's computer. Bob is on holiday. Jane needs to do a release. Now what?
BundleID / AppID
There are two strings that are used to identify apps and what they can do. They are the 'Bundle ID' and the 'App ID'. Just to confuse things, the Bundle ID is the unique identifier for an app, not the App ID.
A very thorough explanation can be found on this stackoverflow post:
But in short, the Bundle ID is used to uniquely identify the app. The App ID is used to associate an app with a provisioning profile. You can have wildcard App IDs. e.g. an App ID of com.enquos.* would match an app with the Bundle ID of com.enquos.fitness.
The App ID is created in the Apple Developer Center (Xcode can do this for you) and specifies what 'entitlements' the app has. e.g. Access to HealthKit data, or VPN control. Hence whilst a wildcard App ID is great in the general case, you will want different App IDs later on when you want apps to have different entitlements.
Provisioning Profile
The provisioning profile is the piece of 'glue' metadata that associates a device with a certificate and App ID.
There are three types of provisioning profile:
-
Adhoc
This profile is the one used to distribute an app for testing by a known set of developers. This profile has a list of Unique Device Ids (UDIDs) encoded in it. In order for someone to install an app using this profile, the UDID of their device needs to be in this profile. Adding devices to a profile is done in the Apple Developer Centre. This kind of profile is used when distributing via 3rd party services such as HockeyApp.
-
Store
The store provisioning profile is used when an app is submitted to Apple for submission to the App Store. It is also used for builds that are submitted to Apple for testing under their 'TestFlight' service. This used to be a 3rd party service, but has recently been bought and integrated into Apple's processes.
-
Enterprise
If you are a large enterprise and looking to distribute apps within your organisation you can sign up to the Apple Developer Enterprise Program. This allows you to sign the apps as though you were Apple itself and you don't need to have all the UDIDs encoded into the app. It means you can distribute your apps via whatever means you want. E.g. putting them on an intranet.
Typically, when developing with Xcode, it will manage the provisioning profiles for you and select the appropriate one at the right time. However as we will see in later posts in this series there are times when we will want to manually select one.
Xcode will use the Bundle ID of the app you are working on and look it up in the Apple Developer Center to find the provisioning profile with an App ID that is compatible with the Bundle ID.
UDIDs
The UDID is the unique device id. Each Apple device has one, and they are used to identify a particular device.
In order to deploy an app via an adhoc profile you need to add the UDID of the device you want to deploy to into the provisioning profile. This is done in the Apple Developer Center.
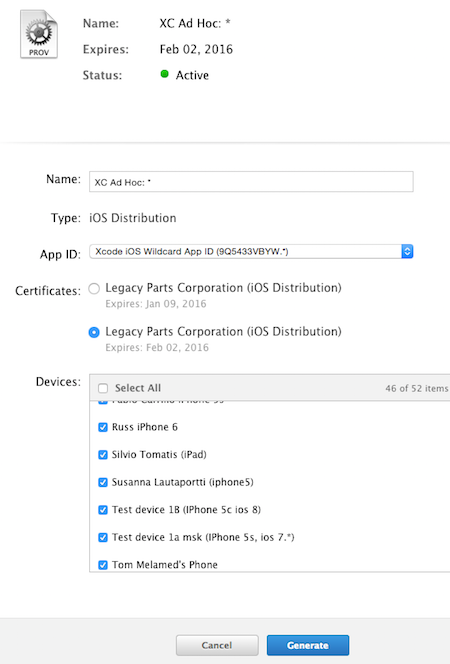
One thing to note, is that the provisioning profile is bundled into the app when it is distributed. Hence once a version of an app had been distributed, you cannot add additional devices to that adhoc deployment. You need to add the new device in ADC, regenerate the provisioning profile, then re-build and re-distribute the app.
This is only an issue for adhoc profiles and distribution. If you are using Apple's TestFlight service then you use a store provisioning profile and you can add additional testers at any point. Even after a release has been uploaded to TestFlight. I'll talk about different distributions methods in a later post in this series.
Scheme
Two elements used to have different build behaviours: schemes and configurations. Apple's docs describe this best:
An Xcode scheme defines a collection of targets to build, a configuration to use when building, and a collection of tests to execute.
You can have as many schemes as you want, but only one can be active at a time. You can specify whether a scheme should be stored in a project—in which case it’s available in every workspace that includes that project, or in the workspace—in which case it’s available only in that workspace. When you select an active scheme, you also select a run destination (that is, the architecture of the hardware for which the products are built).
Configurations
When you start a new project in Xcode there are two configurations debug and release. They mainly differ in that they set different levels of compiler optimisation and debugging information. You can create more configurations if you want, such as to set different icons or app titles. The scheme selects the configuration.

Conclusion
I hope this helps to understand some of the parts of the development process. Much of this is handled automatically by Xcode for you, but in the subsequent posts in this series it will help to understand what is going on under the covers.
This is all based upon my experience of the past few months, if anyone spots anything I've got wrong, let me know in the comments below!
Go Top
comments powered by Disqus